
- Details
- Written by: The DIY Hunter
- Category: Firearms & Shooting
- Hits: 8207

Burris Signature Zee Rings pinching a Vortex rifle scope tube.
I purchased a Vortex Viper 2.5-10x44 rifle scope for my CVA Accura V2 muzzleloader this year. I had my favorite scope (4-16x50 Viper HS LR) on the muzzleloader last year but I moved that scope over to my 28 Nosler X-Bolt. After many trips to the range, I had just found that 300 yards was the extended range my muzzleloader, bullets and my abilities to ethically shoot were. With that knowledge, I felt a smaller scope was in order so I went with this 2.5-10x44 HS scope.
My only hunt with a muzzleloader this year was for elk here in Utah. After several trips to the range in preparation for the hunt, I kept getting poor accuracy with 300 Gr Aerolite bullets that have always shot really accurately for me in the past. I also noticed that vertically an adjustment of 2.5 inches up would change the point of impact by 5-6 inches at 100 yards. What was up with that? Then on two occasions, I noticed that when I went back to the range my zero had been lost and I would have to adjust the scope again. What the heck?!? None of my other Vortex scopes had ever acted this way.
After a couple of phone calls and emails with Vortex they very nicely let me know that they felt I had over torqued my rings and I was convinced that this couldn't be the problem. I use a Wheeler torque driver and originally torqued the screws to 18-inch pounds. After talking with Vortex I cleaned the Loctite off the screws and torqued them to 16-inch pounds and back to the range I went. And once again the scope was changing the point of impact by double the amount I was adjusting. Ha, I was right or was I???
So back I went to Vortex convinced as ever that there had to be a problem with the scope. I had lost all confidence in the scope and wanted another one. It was at this point that I was just about ready to send it in when I had a great conversation with Adam at Vortex. Adam explained how the scope worked and why overly tightened rings could cause issues exactly like I was experiencing. Thank you, Adam! Being a DIY kind of guy I wanted to figure out what was going on myself to make extra sure that it was or wasn't the scope before going to the trouble of sending it back to Vortex.
In discussing how the scope operates with Adam I learned that when a scopes rings get torqued too high it creates extra tension that makes any adjustment change the point of impact by more than it is supposed to, that is until over time the scope settles back to where it was actually adjusted too. As I thought about it, this was exactly what was happening to me. Adjusting the scope would move the point of impact twice as far as it was supposed to change. When I would go back to the range another day my zero would be off by half of the distance from what I adjusted the time before. And because it was in the process of settling to the right position my groups would be less than stellar.
So what was causing the extra tension on the scope tube? I figured the first thing that I would do would be to try some different rings. Before I ordered some rings I decided to give the set up a really good inspection. Had I messed up placing the wrong corresponding MOA shims in my Burris Signature Zee rings or something else? So before I pulled the scope off I looked it all over closely and I found what I believed could be the problem.
Because this scope was on a slow shooting muzzleloader I wanted to tip the scope down 10 MOA in the front to keep the reticle centered closer to the center of adjustment. So, I set the front rings with a minus 10 MOA on the bottom and a plus 10 MOA plastic insert on the top and on the back ring just two "0" MOA plastic inserts. In this manner, I would tip the front of the scope down for a 10 MOA incline. What I couldn't see was because of the 10 MOA incline the self-aligning plastic insert on the bottom rear ring was sticking out from the ring just ever so slightly and it was putting pressure on the tapered incline of the rear of the scope tube. This happened because I had set the scope as far forward as possible. When mounting the scope originally I was looking down from the top and could see that I had clearance from the ring to the taper of the back of the scope tube but I didn't realize that the insert was sticking out on the bottom and was applying pressure to the taper of the scope tube.
So, was this the problem? Yes, it sure was. I mounted the scope 1/8th of an inch farther back giving it plenty of clearance and headed back to the range. The scope is now tracking perfectly and my accuracy has returned. Awesome! Confidence was restored and I didn't have to look like a novice shooter to the Vortex team by sending it back to find nothing wrong with it. :)
Vortex, thank you for your patience, help and for making great products!
- Details
- Written by: The DIY Hunter
- Category: Firearms & Shooting
- Hits: 5757
For my trip to Spirit Ridge Rifle Golf course this summer I was excited as always especially with taking my new death ray 28 Nosler X-Bolt rifle.
I shot the master's course as usual. It wasn't my best score but I was very happy with the misses I had been well within where I thought they should hit. In other words, I didn't have any fliers that didn't make any sense. I just barely missed the small 1,000 yard target as also the other targets I missed.
After shooting the course I shot a three shot group at 1,200 yards on the driving range that from a distance looked to be well within a 1/2 minute of angle. I was using a floating holdover for the windage on these three shots since my Vortex Viper HS LR scope has a capped windage turret. In other words, I was very pleased with the group size at 1,200 yards given I wasn't holding on a specific point on the target nor my crosshairs just about halfway to the first windage marker on my reticle.
The 175 Gr ELD-X bullets were traveling 3,218 fps with a mild load of Retumbo. View my 28 Nosler Handloads and Ballistics.
Here are some of my shots from the day with my 28 Nosler.
- Details
- Written by: The DIY Hunter
- Category: Firearms & Shooting
- Hits: 16906
While setting up my new 28 Nosler, Browning X-Bolt rifle, it started shooting like a house of fire right out of the chute and then accuracy started to get increasingly degraded. Here is the process I used and how I found adding an extra step to my cleaning process restored my accuracy.
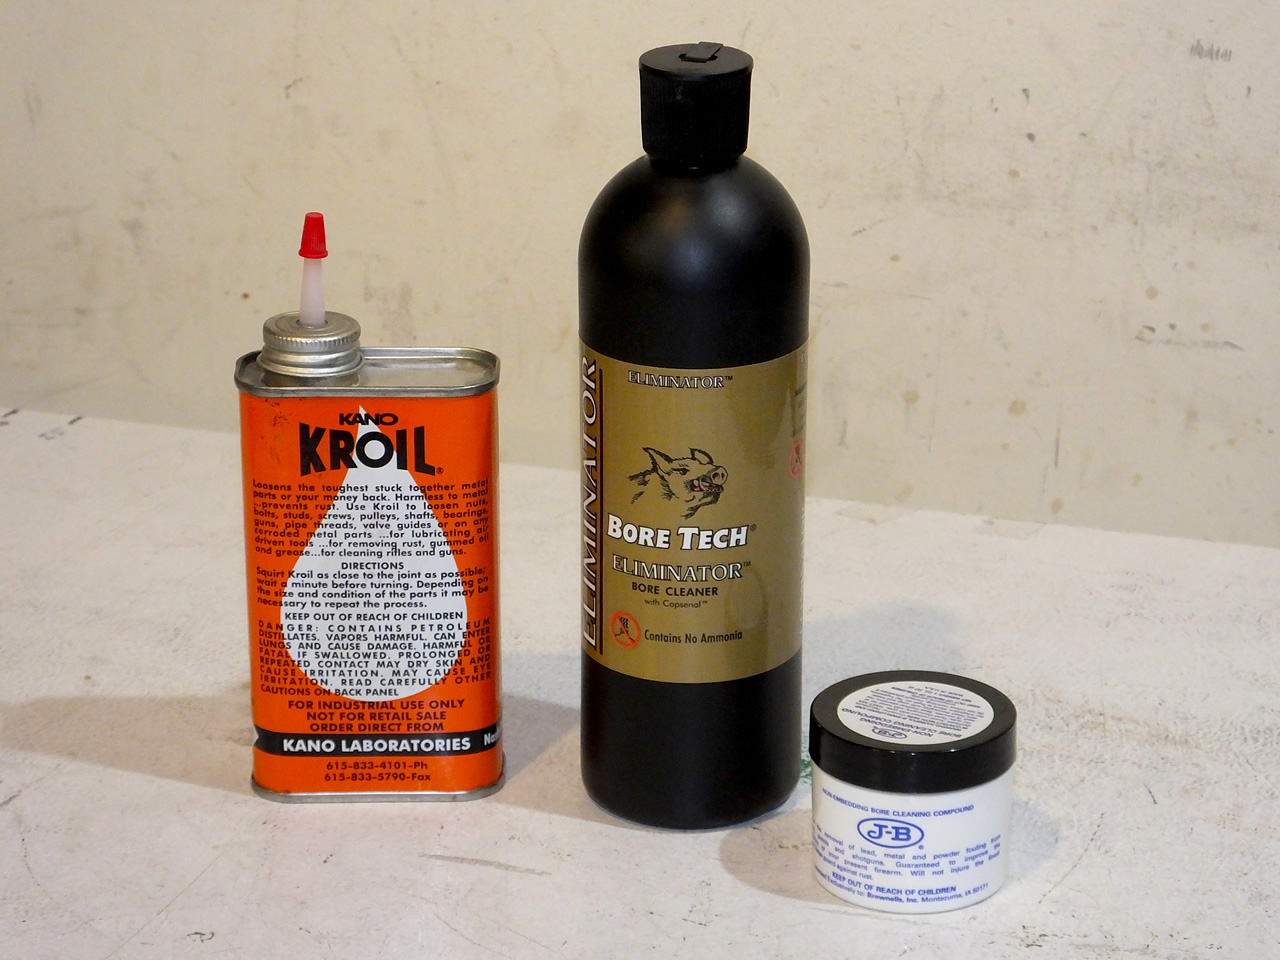
After getting my new rifle I thoroughly cleaned the bore with a Bore Tech Eliminator and Kroil as I have with all my firearms in the past.
For my first outing to the range, I had 10 rounds loaded up with H-1000 powder. The first shot was to verify the point of impact from bore sighting using the simple look down the bore technique. Then I had three different powder charges for three shots apiece. All three of these three-shot groups shot sub MOA with one grouping at 3/8" at 100 yards. Awesome! That was quick, however, I needed to shoot more to verify it would be consistently accurate.
Trip two to the range I shot two more three-shot groups at 100 yards with the tightest load from the first trip to the range. The first group was just over an inch and the second was back under an inch at 7/8" and I shot a third three-shot group at 300 yards that were five inches with a flier to the right. Not so good. Hmm...
My third trip I shot three, three-shot groups again at 100 yards and all three groups were in the 1 1/2" to 2" range. Ahh!!! Opening up even more. This was when it clicked that I had to be having fouling problems.
I tried my usual cleaning process of Kroil and Bore Tech Eliminator. And headed back to the range again this time to shoot a ladder test at 300 yards with different powder charges incrementally in 0.2 grains. On this trip, I found a couple powder charge nodes with the best node being right where I had been loading my favorite load from the very first day. However, the ladder wasn't as tight as I would have liked it to be and the theme of fliers going to the right was continuing. Ahh!!!
Ok, I was convinced that there was an issue with the barrel fouling and discussed the issue with my engineer friend. He recommended JB Bore Paste. As I learned, sometimes a new rifle bore needs a little polishing with a mild abrasive to smooth out any imperfections that persist from the factory. I have heard of this working awesome on barrels in the past but have been very nervous about taking any kind of abrasive to my rifle bores. My X-Bolt has a chrome line bore and I wondered how the JB Bore paste would work. My friend confirmed that it would work great with the chrome-lined bore.
So here are the three things I run through my bore on cloth patches. The first item is Kroil that is an oil I like that will penetrate, help lift carbon and other debris in the bore. Second, Bore Tech Eliminator is an awesome chemical process that breaks down the copper. You can leave it in the barrel and it won't harm your barrel like an ammonia-based Barnes CR2 cleaner would. The third is JB Bore Paste, which is my new addition to my cleaning process. JB Bore paste that is a mechanical process that scrubs and polishes the bore.
So before my next trip to the range, I used a combination of Kroil, Bore Tech Eliminator and JB Bore paste. I would run patches of Bore Tech Eliminator from the chamber and out the muzzle followed by dry patches. After this, I would run a patch of JB Bore paste except with the JB Paste I would stroke the patch back and forth in the barrel for around 10 times. I would then follow with a couple of dry patches and then repeat the process with using the combination of the chemical and then mechanical cleaning agents.
After I had repeated the process 10 times my chemical patches were only a very, very faint blue color. Blue is the color your patch will be when it reacts with copper. A couple of dry patches and a Kroil patch to finish it off and I was ready to head back to the range.
On this trip to the range, I wanted to test a couple of things at 300 yards. First I wanted to try a group with the original H-1000 load and then I wanted to try Retumbo powder ladder. So I first shot a fouling shot at a clay pigeon I had sat out at 300 yards and I drilled it. Cool! Immediately after that I shot three shots with the H-1000 load. Bingo. These three shots made a 2 1/8" group that measured only 1" vertically. And the one "flier" for the group was to the left instead of the right which at 300 yards the varying wind speed can easily effect. Even at that, this is the equivalent of a group under 3/4" at 100 yards. This is right at the size of groups I was getting with the load at 100 yards previous to the JB Bore paste cleaning.
Right after firing this group I started on my Retumbo ladder test. Holy crap the first two shots of the ladder were near touching at 300 yards and the velocity and point of impact is the same for the H-1000 load I had just shot. That's awesome! In this ladder test, there were two three-shot sub MOA nodes. The overall group from the ladder was three inches narrower that the previous (non-JB Bore Paste cleaned) ladder with the same light wind conditions.
Next trip I'm going to shoot some Retumbo loads in the tight 1 and 2 shots powder charges from my ladder test. And I think I will clean the barrel again but only run a couple JB Bore paste patches this time.
I'm hooked, JB Bore Paste is now going to be a part of my cleaning process. I can think of a couple of other rifles I would like to use it in that have had group sizes getting a little larger than I would like. Hmm...